ShopDreamUp AI ArtDreamUp
Deviation Actions

ProjectComment is a Group of many projects centred around comments, but, more importantly, constructive comments. We offer Members of deviantART a lot of opportunities to get comments, give comments, participate in comment projects, win points, get featured and much, much more!
In this series of articles, our admins aim to answer questions about anything related to comments/commenting, art and more! Here are our answers to BlueFireballs's question:
 learned a lot from anime/manga, comics/cartoons and real life. She suggests, "The best way to go is turning the mind off and starting somewhere. After that, you can do some fine-tuning until you get a result you are happy with. I would always recommend experimenting a lot!
 ") Tutorials also help."
Tutorials also help."
 recommends these tutorials:
www.dragoart.com/tuts/2124/1/1…
www.dragoart.com/tuts/2301/1/1…
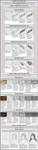
 suggests, "As with most things I do, this starts with a Google search. I don't know squat about fashion so I just look over pictures till I see a style that looks close to what I want.
When picking a style I tend to think about the character. Firstly what time period is he in? If it's modern day then fashion shots of celebrities are useful. If it's in the past then I'll try to find examples of styles from that period. If it's in the future then there's no rules and I tend to look for really strange styles. After that I consider the personality; a shy person gets very neat hair, an out going or carefree person gets messier hair. Bookworms will get short hair, jocks get hair that's spiky and points up a bit.
Once I have that I put in the outline. Mark out how far it will reach; covering facial features and how far off the head it will lift up.
If it's messy hair I'll mark in some tufts of hair, making them overlap to try and get some depth but all pointing in the direction the hair flows in that spot on my reference. If it's a neat style I'll just mark in boundaries where the hair changes direction, essentially delineating all the parts.
After that I move on to coloring. The only thing I keep in mind here is to try and make all of the pencil lines match the direction of the hair, this way any stray lines will give the hair more texture.
This would probably be easier to understand if I had some pictures to go with it. Sadly I've lost the tutorials I built this style from. This looks pretty close to how I approach it:
 "
"
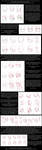
 suggests, "The main thing is to remember the hair is not a separate entity from the scalp. The scalp line is also interesting as hair is not plastered to the head like a hat or something. The hairline is easily studied by looking at shaved heads or baby heads. Mostly it recedes at the forehead and right at the ears, even on women. Doesn't need to be too pronounced. And then focus on how the hair grows and is layered. Mainly I try to draw the hair in very loose sections. And then shade in the darkest areas in a flowy way that the hair grows. Some areas are blown out by highlight And others are hidden in shadows so it's not just repetitive stringy strokes all the time. But mostly stay delicate with it. For boys, it seems to spike in certain areas, slightly. And the hair moves so focus on not making the sections look glued together. Looseness and liveliness are important while drawing hair."
 suggests, "I found this tutorial particularly insightful.
The difference between guys' and girls' hair is usually in length. They grow out of the scalp in the same way, but the added weight of longer hair causes it to fall a bit different. In general, a good approach is to get the softer, darker bits blocked out and then increasingly sharpen/harder your brush and add lighter tones. That goes for digital painting, if you wanted a tutorial on traditional methods, I'm sure I could hunt one down for you.
I'll echo what's been said here and really put in a plug for references. Sometimes it's best not even to see the hair as hair, but just as bunches of brush or pen strokes. I would avoid drawing too many strands, otherwise it'll look a bit stringy (if that makes sense). When you look at hair, you can't see every single strand, but you usually pick up on groupings of colors and such.
I hope this helps!
 suggests, "There are a lot of methods of drawing hair. They mostly depend on the drawing style you chose. But I think the basic steps stay the same.
At first I choose the hairstyle I want to achieve. Sometimes it’s hard to draw short hair, because there are no long strands and they tend to look like a solid form.


Next tutorials will help if your style is traditional or digital realism and semi-realism, where you need a lot of patience to carefully draw each strand.

I also learned a lot from classical drawing books, such as ‘Drawing the Head’ by Andrew Loomis: illustrationage.com/2013/04/02…
If you want to focus the viewer’s attention on the face, there’s another method – sketch the hair. It works both for traditional (especially, charcoal) and digital portraits. louissmithart.com/gallery/char…
This digital art tutorial will help you to achieve great results without drawing each strand:

 suggests, "Basically, drawing hair always works the same way, no matter whether you're drawing long or short hair.
One of the most important things to remember is that when drawing hair it's best to think of it as strands or blocks of hair instead of individual hairs. Don't lose time with drawing every single hair, focus more on the overall shape of the hair style you want to draw, otherwise you risk ending up with "spaghetti hair". I always try to "bring details into focus", i.e. I start out with vaguely defined shapes, and gradually define strands of hair and add detail. Learning where to put details and how much detail exactly takes some practise, but it's a good way to learn to not overdo it with detail in my opinion. Another thing is studying from real life or reference pictures. That's a pretty good way to learn to draw pretty much everything in natural existence.
Tutorials I can recommend for drawing hair:
:thumb443066747:
 There are a few more suggestions for drawing hair in this thread.
Do you have any suggestions? If so, post them here!
If you have questions that you would like us to answer, please ask here as a reply to this blog, or anonymously through this form. Our volunteers will then answer your questions to the best of our abilities, and we will then post our answers as an article for you!
Thank you for reading!
ProjectComment
In this series of articles, our admins aim to answer questions about anything related to comments/commenting, art and more! Here are our answers to BlueFireballs's question:
How do you draw boys' hair?
learned a lot from anime/manga, comics/cartoons and real life. She suggests, "The best way to go is turning the mind off and starting somewhere. After that, you can do some fine-tuning until you get a result you are happy with. I would always recommend experimenting a lot! recommends these tutorials: www.dragoart.com/tuts/2124/1/1…
www.dragoart.com/tuts/2301/1/1…
suggests, "As with most things I do, this starts with a Google search. I don't know squat about fashion so I just look over pictures till I see a style that looks close to what I want. When picking a style I tend to think about the character. Firstly what time period is he in? If it's modern day then fashion shots of celebrities are useful. If it's in the past then I'll try to find examples of styles from that period. If it's in the future then there's no rules and I tend to look for really strange styles. After that I consider the personality; a shy person gets very neat hair, an out going or carefree person gets messier hair. Bookworms will get short hair, jocks get hair that's spiky and points up a bit.
Once I have that I put in the outline. Mark out how far it will reach; covering facial features and how far off the head it will lift up.
If it's messy hair I'll mark in some tufts of hair, making them overlap to try and get some depth but all pointing in the direction the hair flows in that spot on my reference. If it's a neat style I'll just mark in boundaries where the hair changes direction, essentially delineating all the parts.
After that I move on to coloring. The only thing I keep in mind here is to try and make all of the pencil lines match the direction of the hair, this way any stray lines will give the hair more texture.
This would probably be easier to understand if I had some pictures to go with it. Sadly I've lost the tutorials I built this style from. This looks pretty close to how I approach it:
" suggests, "The main thing is to remember the hair is not a separate entity from the scalp. The scalp line is also interesting as hair is not plastered to the head like a hat or something. The hairline is easily studied by looking at shaved heads or baby heads. Mostly it recedes at the forehead and right at the ears, even on women. Doesn't need to be too pronounced. And then focus on how the hair grows and is layered. Mainly I try to draw the hair in very loose sections. And then shade in the darkest areas in a flowy way that the hair grows. Some areas are blown out by highlight And others are hidden in shadows so it's not just repetitive stringy strokes all the time. But mostly stay delicate with it. For boys, it seems to spike in certain areas, slightly. And the hair moves so focus on not making the sections look glued together. Looseness and liveliness are important while drawing hair." suggests, "I found this tutorial particularly insightful.The difference between guys' and girls' hair is usually in length. They grow out of the scalp in the same way, but the added weight of longer hair causes it to fall a bit different. In general, a good approach is to get the softer, darker bits blocked out and then increasingly sharpen/harder your brush and add lighter tones. That goes for digital painting, if you wanted a tutorial on traditional methods, I'm sure I could hunt one down for you.
I'll echo what's been said here and really put in a plug for references. Sometimes it's best not even to see the hair as hair, but just as bunches of brush or pen strokes. I would avoid drawing too many strands, otherwise it'll look a bit stringy (if that makes sense). When you look at hair, you can't see every single strand, but you usually pick up on groupings of colors and such.
I hope this helps!
suggests, "There are a lot of methods of drawing hair. They mostly depend on the drawing style you chose. But I think the basic steps stay the same.At first I choose the hairstyle I want to achieve. Sometimes it’s hard to draw short hair, because there are no long strands and they tend to look like a solid form.
Next tutorials will help if your style is traditional or digital realism and semi-realism, where you need a lot of patience to carefully draw each strand.
I also learned a lot from classical drawing books, such as ‘Drawing the Head’ by Andrew Loomis: illustrationage.com/2013/04/02…
If you want to focus the viewer’s attention on the face, there’s another method – sketch the hair. It works both for traditional (especially, charcoal) and digital portraits. louissmithart.com/gallery/char…
This digital art tutorial will help you to achieve great results without drawing each strand:
suggests, "Basically, drawing hair always works the same way, no matter whether you're drawing long or short hair.One of the most important things to remember is that when drawing hair it's best to think of it as strands or blocks of hair instead of individual hairs. Don't lose time with drawing every single hair, focus more on the overall shape of the hair style you want to draw, otherwise you risk ending up with "spaghetti hair". I always try to "bring details into focus", i.e. I start out with vaguely defined shapes, and gradually define strands of hair and add detail. Learning where to put details and how much detail exactly takes some practise, but it's a good way to learn to not overdo it with detail in my opinion. Another thing is studying from real life or reference pictures. That's a pretty good way to learn to draw pretty much everything in natural existence.
Tutorials I can recommend for drawing hair:
:thumb443066747:
Do you have any suggestions? If so, post them here! 
If you have questions that you would like us to answer, please ask here as a reply to this blog, or anonymously through this form. Our volunteers will then answer your questions to the best of our abilities, and we will then post our answers as an article for you!
Thank you for reading!
ProjectComment
Magic Week - Reverse Caption
The power flowed into him, filling his lungs, spreading out in his blood like oxygen, and settling into the marrow of his bones. He felt himself smile in a way that he hadn't since he was a boy learning to cast his first spell. He had devoted decades to the study of magic, but now, now he was magic. A glow lit the trees around him. He couldn't be sure if it was the setting sun, or if the glow came from his own skin. A beetle crawled on the ground nearby, seemingly unconcerned with what it had just witnessed, but yet its movements were in time with his heartbeat. A bird in the sky flapped its wings to the same rhythm. A breeze plucked at his hair and clothes. He began to dance, slowly at first; he followed the wind, and the wind followed him. He moved faster, twirling and leaping, until even the fallen leaves were dancing around him. When he stopped, all was still. He smiled again, and raised his arms to the sky. The first stars were visible. He watched them for a long
Feature of Great Commenters: July
As a result of our Nominate a Commenter + Win 100 Points project, we will be announcing the winners of those 100 and bringing you features of our great commenters every month! Week of 13th - 27th June Congratulations @Frozen-Faeriefyre for winning 100 :points: ! Feature of Great Commenters! @Anukisima, @BeckyKidus, @bioniclop18, @DoubleDandE, @lightLast, @Sori-Eminia, @VonGrechii, @Ymrabelle Week of 27th June - 11th July Congratulations @Dragon-Beans for winning 100 :points: ! Feature of Great Commenters! @Anukisima, @DoubleDandE, @kmkibble75, @lovelyHanibal, @raichmann, @Sori-Eminia, @Souvillaine, @StephOBrien, @TheCrimsonSpark, @Ymrabelle If you would like the chance to win 100 :points: or be featured, nominate a commenter now!
Submit Freestyle + New Theme
Theme Submissions for This Week We accept 1 deviation a day to Theme! Theme: Toys, suggested by LDFranklin Theme Description: Photographs of objects that children play with. Starts: Sunday, August 2nd Ends: Sunday, August 9th Send in your submission >HERE< by suggesting it as a favourite. The best submissions will be added to the gallery! Weekly Feature Many thanks to LDFranklin for suggesting this week's theme! Check out their art now! Last Week's Theme Submissions: Reflective Theme Submissions Info for Next Time Theme: New, suggested by Coigach Theme Description: TBA Starts: Sunday, August 9th Ends: Sunday, August 16th Pending Themes Borders & Edges, suggested by AlejaOlch HDR, suggested by AlejandroCastillo Murky, suggested by Laerian Delicate, suggested by crestmultimeadia Open Landscapes, suggested by Lumimyrskydawn Odd, suggested by Abnormalion Street Art, suggested by jlxp Fluffy, suggested by AlejaOlch Nature in Cities
No Constructive Comments #61
ProjectComment has been an active group since 2009 to give you the constructive comments you deserve! What better way to do that than to give and get constructive comments on the artworks that have none in our No Constructive Comments project? Comment on some of the pieces below today, and link us your comments for a chance to be featured in our monthly newsletter!
Featured in Groups

© 2014 - 2024 3wyl
Comments4
Join the community to add your comment. Already a deviant? Log In
Thank you everyone who contributed to this. I will definitely be looking at those tutorials. Wow, just thank you so much!